Keywording and SEO

Professional herbalists offer natural, holistic, herbal healing remedies, recipes, tutorials and nutritional information to help support healthy living.

Page Tabs

April 20, 2011

Natural Homemade Plain Almond Milk Recipe, The Herblist Way

Funny quote to throw in just quickly:
"A corpse is meat gone bad. What's cheese? Corpse of milk." ~James Joyce

Making almond milk at home has been on my to-do list since forever. Just some raw almonds, water and a blender are the main components needed to make it happen.

The store-bought versions are so filled with tasty-goodness, I was addicted to it for a while. It is so nutritious, I could just feel the nutrition flowing through me with every sip!!! *snort* This stuff is like crack!!!


If you have never had almond milk, it is not very different than cow's milk in consistency. The flavor is also similar and actually, if used in cereal I am unable to detect a difference. But by itself or as a non-dairy creamer for coffee, and used as a substitute for milk as a baking ingredient, it is yummy to the max! I might be mistaken but it might also be cheaper than a gallon of milk, too (in the USA). There are always coupons for almond milk going around.

There are too many benefits to list for consuming it. Info here.

Here are some photos of how I made mine yesterday.

It's not crazy. It's nuts!


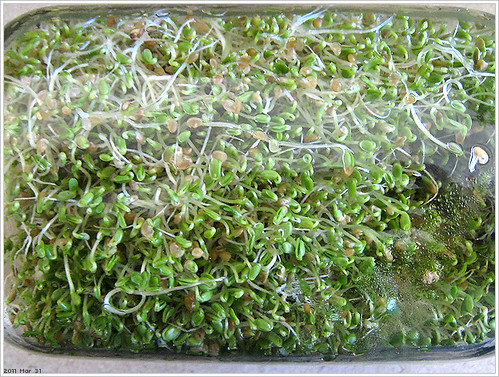
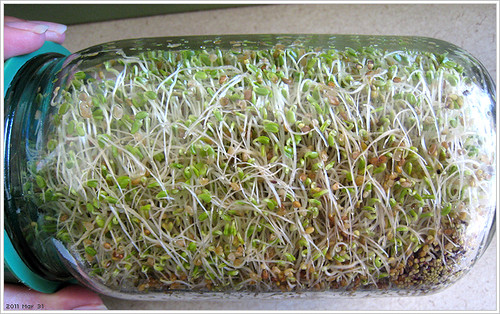
On the left, dry out of the package. On the right, soaked overnight.

Sprouting the almonds: The skin of almonds holds in them what is called an enzyme inhibitor. This prevents the almond from sprouting until the conditions are right for it to do so. (Nature is so awesome!) Removal of the inhibitor also makes them easier to digest.

Nutritionally, the sprout phase of a plant is when it is highest in vitamins and minerals, and so, soaking the almonds first to sprout them gives the greatest benefit when using them for consumption or for making cosmetic products. For making almond milk, soaking longer gives a more mild flavor. Less soaking time or no soaking time gives it a more nutty finish. They can be soaked for up to twelve hours and minimally for four. I soaked mine for 12 hours.

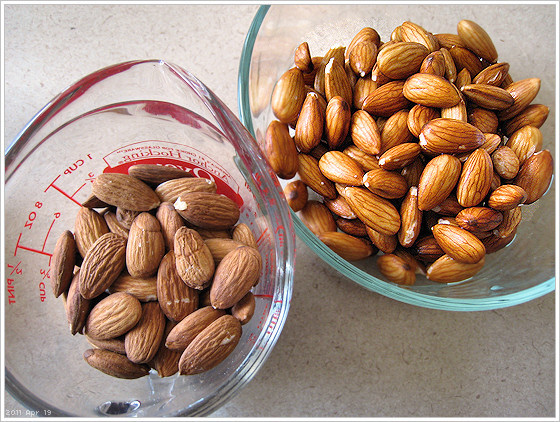
I used one measured cup of raw almonds. (Roasted almonds are not the correct type of almonds to use.) Raw almonds can be found in the baking section of a grocery store and sometimes in bins at a health food store.

After soaking, they are rinsed thoroughly to remove any residual enzyme inhibitor and are then added to the blender with 3 cups of water. If I was going to add something like dates to sweeten the milk, I would probably use 4 cups of water in that case. I could also add to this some vanilla extract or vanilla bean, a dash of cinnamon, some agave nectar, honey or other sweetener. For this entry I'm just making a pure, unsweetened milk base.


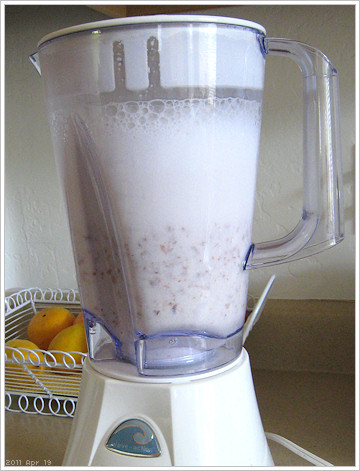
Immediately once the almonds start whirring in the blender, the contents become white and frothy. In a low-end blender like mine (I don't do much blending actually), pulse on low and then switch to high and blend for 3 to 4 minutes adding a dash of salt at any time. On a high-powered pro-style blender like a VitaMix, 2 minutes is really sufficient.


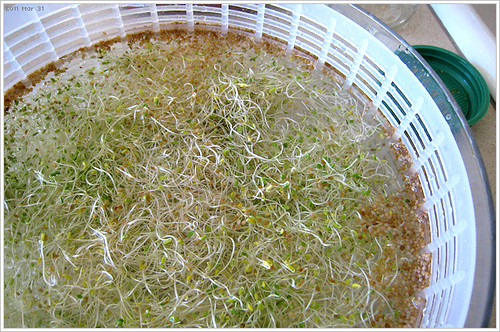
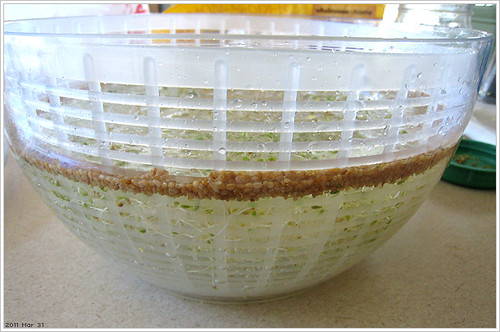
To separate the milk from what doesn't get blended down, I used cheesecloth over a mason jar secured with a rubber band. Next time I would prefer to do this over a bowl and perhaps use a different type of straining material like hemp cloth or something. There are fine mesh bags similar to lingerie laundering bags available to purchase too. They are called nut milk bags for people who do this regularly. I may get a few.


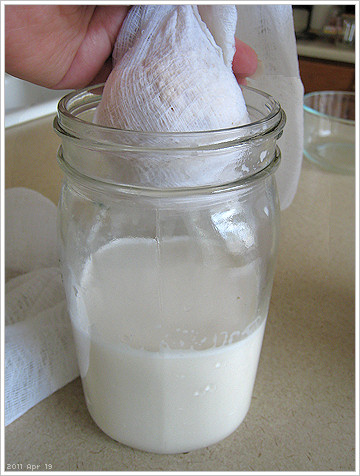
Here I lifted out what I had strained so far and started squeezing away at it to get the rest of the nut milk out of the pulp.


It looked so tasty, I was guzzling it right then and there. The amount in the jar is probably 1/3 less than what is supposed to be in it.

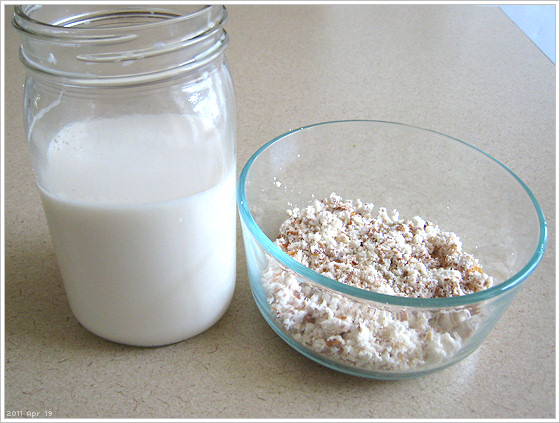
On the left is the remainder of almond milk I didn't chug. The jar was eventually sealed and went into the refrigerator. (It should keep for about 4 days.) On the right is the nut pulp.


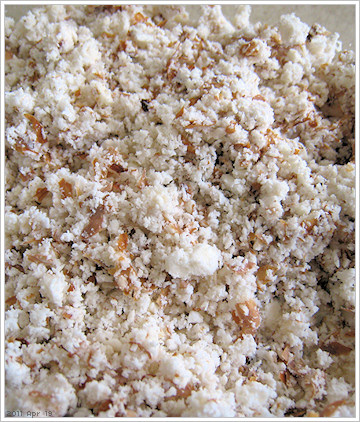
The nut pulp here is also referred to as almond meal. Other types of meals are oatmeal and cornmeal. The deal with "meal" is simply that it is finely ground product and that's about it. You could make this out of regular unsoaked almonds in a powerful coffee bean grinder actually.

There are a bazillion things that can be done with this. As an ingredient for food, it can also be dehydrated, sifted and then turned into almond flour to use for baking. It can be toasted in a toaster oven to be turned into almond nut butter in a food processor. Yep, that nut butter that costs about $12.00 at the store... this is all it takes to make it.

As a beauty product, almond meal is often used as an exfoliant. Add to the meal a few drops of almond milk, water etc.) and make it into a paste to use as a scrub. Other things that can be added to it are lemon juice, honey, baking soda, aloe, rosewater, witch hazel. (LOTS of possibilities!) It is really gentle and the natural healthy oils in it really do wonders for the skin.

As a body scrub, add some ginger for an invigorating aroma and to help prevent breakouts and control acne. Use avocado, mashed cucumber... so many ways to go!

It feels so heavenly to mix with my hands. The natural oils in it are dreamy. It feels like a mixture of feathers and marshmallows. lol.

My preference for this round is to use it as a dredge for chicken or fish. Mixed with a bit of chili powder, it is actually going to be the crispy coating on the protein portion of my dinner tonight.


Almond Meal Chicken: Recipe

The last one up there is not my photo but looks so yummy!

Here is a video where, in less than 60 seconds you can see a fairly handsome foodie gentleman giving a not-as-thorough but informative visual on making homemade almond milk.


That is it for my kitchen projects for the week. Thanks for looking and happy herb-hacking!

April 18, 2011

How to Make Home-Made Ginger Candy, Ginger Ale & Diet Ginger Ale

The fresh ginger root in the produce section of the stores is a lot of product to use! My regular recipes don't require it as an ingredient too often at all, and I had bought some to start adding to my stir fry. I do not cook stir fry often enough, and I am not keen on having the ginger sitting around for a long time to waste away slowly.

When I was doing my herbalist courses at the healing college, they drilled it and drilled it into us that anything that could be used as medicine was especially precious and to get everything we could possibly get out of it.

Medicinally, ginger is used as an anti-inflammatory. Commonly it is taken to reduce symptoms of indigestion, nausea & vomiting, and for pain relief from arthritis and damaged cartilage. It is also an expectorant and is used to treat symptoms of heart disease. It is potent and not something you'd want to eat gratuitously especially if you are on blood thinners, taking prescription antacids or if pregnant. (FYI)

I considered some quick and easy recipes using ginger as a main ingredient. Ginger candy came up in my search results, and after reading the process of how to make the candy, it looked like I would actually be able to make ginger ale from what the ginger candy left over. ...Two birds with one stone. Cool!

So here we go to start making ginger candy and home-made ginger ale...

Kitchen, Kitchen, what are we fixin'?


The ginger candy requires fresh ginger root and sugar. For ginger ale, add to it: lemon juice and active dry yeast. I will show you!


----Regular Ginger Ale----
How to make homemade ginger ale

Grated ginger root. The recipe calls for nearly 2 Tbsp of fresh grated ginger for a 2L bottle. The bottle I am using for my product is a 1L bail-top glass bottle so I halved everything on the recipe.


To the bottle I added 1/8 tsp of active dry yeast. ---- And then just under 3/4 cup of sugar. I used organic.


I juiced half a lemon and poured the juice into the bottle and added the grated ginger as well.


Last, I added water to the bottle, making sure to leave just over an inch of room for air at the top, and then sealed it up. The bottle is then carefully turned to agitate the contents and get them to mix up a little bit and then it is left to do its thing!

The active yeast feeds on the sugar, resulting in a release of carbon dioxide. This process of fermentation gives effervescence (light carbonation) to the drink. In the case of this recipe, alcohol content is very negligible. A more intense fermentation process would turn this into a true "ale" or beer.

From here, the bottle is left at room temperature (in an area about 75°F / 23°C ) for anywhere between 24 and 48 hours. In that time, pressure builds in the bottle. One thing I was warned about was being careful about the pressure building in the bottle. Left unchecked, the bottle will explode.

In most of the recipes I found, reuse of an empty 2 Liter plastic soda bottle is a convenient practice. In the case that a 2L plastic soda bottle is used, the bottle will be easy to squeeze once capped, and then as the fermentation process continues, the bottle will become more and more difficult to depress, exactly the way the soda bottles are when they are purchased sealed at a store.

I read a tip much later that said to simply cap the bottle with a balloon, and it would inflate as the gas pressure would build up. That would have been awesome to take progress shots of. Wish I had read it sooner!

The bottle I am using is a wire bail-top bottle. They can be found at stores like Target, WalMart, some grocery and health food stores, etc. for about $5.00 or $6.00. Stores like Ross, Marshall's, TJ Maxx and other discounters sell them for less. I got mine at Ross for $1.99

I'll talk about how it turned out at the bottom of the page. Now let's go make some ginger candy!


----Ginger Candy----
How to make homemade ginger candy

The rest of my ginger root was sliced into 1/8 inch thick medallions. I managed to fill a measuring cup to 1 cup with what I had left, and then adjusted the recipe accordingly. My recipe wanted to 2cups. Lucky me, I got to halve a recipe again. LOL.

Into a small saucepan, the ginger was added to 1 cup of water and 1 cup of sugar. It is left to simmer on low for about 30 minutes. It took about 10-15 minutes to get it to the simmering point on a lower medium heat. In total, about 40-45 minutes on the stove.

While looking at several recipes I saw that some of them called for getting the water boil steadily. Higher temperatures can destroy active and vital compounds that actually provide the beneficial qualities of foods like this so, simmering at lower temps for just slightly longer is the way I preferred to go.


For the purpose of making the candy, simmering the ginger softens it while the sugar water is allowed to penetrate into the cells of the root to give the batch a sweeter flavor.

On the other hand, for the purpose of making a medicinal syrup, in herbalism this process is called decocting. Making a decoction is the process of extracting volatile oils and other compounds by boiling them out of hard organic matter such as a root, rhizome or tree bark.

If I were boiling the ginger in water without the use of sugar, the resulting decoction is stronger and far more potent than in a tea. The resulting product is considered truly medicinal, whereas a tea is something more passively therapeutic in comparison (more homeopathic). Decocting is the process by which the medicine men, and witches and warlocks are illustrated to be doing crazy things with a cauldron and were scandalously labeled as people dealing with the devil to have made healing miracles happen.

Back to the recipe, after about 40-ish minutes, the contents of the saucepan were reduced by about 50% or so and then it was time to fish out the pieces of ginger.


While fishing out the pieces of ginger, the syrup was poured into a glass jar. In my planning I wasn't prepared with a receptacle to hold the syrup actually, so pardon the funny looking jar. ;) I took the ginger pieces and rolled them around in a small bowl of sugar to coat them.


They looked so pretty already. And looked so edible. But they weren't done yet! lol. Still one more step in this process before they would be palatable.


I laid them out on a baking sheet. The recipe called for them to be baked for 2-3 hours at 255°F / 124°C. Of all the days I wanted to do this project, it turned out that yesterday the weather was 98°F / ~37°C outside so like... ya... lol... HOT. I did not want the oven on for 3 hours at any temperature. Whew! Ugh... mkay so the better alternative was to put them in the toaster oven. That worked just great.


See you in about 3 hours! *waves bye*


After I pulled them out of the toaster oven they were nicely toasty-looking. Candying them wasn't so bad! The taste is a bit difficult to describe. It's almost like a spicy-ish licorice flavor (more of the black licorice type), somewhat of a mild, sweet clove-like flavor. I am not a fan of either black licorice or clove but this was good!

I think asking for the cuts to be 1/8 thick was almost on the edge of too much flavor. If I do this again, I would go slightly thinner and use less sugar in the recipe for the ginger medallions to simmer in. Very flavorful, though! The ginger pieces were just chewy enough; neither gummy or taffy-like. The sugar coating gave them a nice, crisp crunch. Great texture.

And so, for the syrup... a lot of things can be done with this. I chose to use it to make a diet ginger ale because, according to the internet at present, there is no way to make diet ginger ale, and I know how to! Fermentation requires actual sugar and use of that equals not a diet beverage. So we add syrup to carbonated water like one would to make soda pop.

So for people like me who are careful about sugar intake, the recipe for mostly home-made diet ginger ale would be something like this:

----Diet Ginger Ale----
How to make homemade diet ginger ale

Add 1 cup of sliced fresh ginger root to 1 cup of water and 1 cup of granulated Stevia extract. Simmer for 30-45 minutes on medium heat reducing the liquid to about 50%. When ready, remove the ginger root, straining the remaining syrup liquid into a jar or measuring cup. Allow to cool. (As the syrup cools it will become thicker and darken.)

Add the desired amount of syrup to diet tonic water, seltzer water, club soda, or carbonated mineral water. Since my initial approach to using the syrup was to take advantage of its medicinal value, my choice of what to mix the syrup with was diet tonic water, because it contains quinine.

Quinine is used to treat malaria. It isn't a concern here in developed countries, but does have properties that help to reduce a fever and in larger doses can be used as a pain killer. It also works to treat arthritis, and cramps such as leg cramps and stomach cramps. The bitters in it help to stimulate the production of enzyme amylase, which aids in digestion of foods and will also stimulate the appetite. The amount in tonic water is low, and quinine as a substance is regulated and standardized to minimize the dangers of its potential misuse.

In combination with ginger, it is a potent pain reliever. Anyone with a stomach flu or stomach issues especially, would benefit for sure, and if you don't have issues, it will work excellently as an aperitif at parties that have a  multi-course menu.


I used half of the syrup I produced and mixed it into 1 liter of diet tonic water.

The flavor and color of home-made ginger ale is unlike what we buy in the store. Store bought ginger ale often does not have actual ginger in it, but a ginger-type flavoring with added coloring. Both the regular and diet versions of home-made ginger ale are light-colored like cloudy fresh-made lemonade.

It tastes hm... somewhat like a sweet lemon water with a dash of cinnamon? Again hard to describe, but can be made more mild or even sharper in flavor by tweaking the amount of ginger used in the recipes.

If you ever do have to buy ginger ale for someone who is feeling under the weather or has stomach issues, find the brand of Canada Dry that says on the label it is made with real ginger. (It is a bit hard to spot on the label.) Months ago I had to grab a bottle for someone and it also said on the label it had quinine added to it. I am not sure if it has enough ginger in it or not to consider its efficacy to be more than just the quinine and placebo effect, but that or tonic water are a lot more helpful and work quicker than franken-chemicals from the pharmacy.

Fun, fun, fun, easy, inexpensive and therapeutic even if you don't need it to be.

Happy herb-hacking!

April 12, 2011

Sprouts: A Fun, Healthy, Easy To Grow, Low-Light Kitchen Plant

I have a planter box in my kitchen with some lemon balm and oregano growing in it. I chose those herb plants mainly because I read they didn't need very much light beyond the ambient sunlight in a room to really thrive. I didn't want to have to keep moving the planter box back and forth into direct sunlight every few days, and those two would work best for me mainly for decorative purposes more than for culinary purposes.

On my search for low-light plants I stumbled across articles for home-growing sprouts. I had forgotten about sprouting! It's really easy to do. When I was in grade school we did sprout-growing and even grew grass on sponges because all they need is moisture to get going. It is amusing if you like to watch grass grow. And I do! LOL. The whole process takes 4-5 days.

I had found and purchased a straining lid specially made for home-growing sprouts. The lids like the one I bought will fit onto a wide-mouth mason jar.


Along with the lid, I went ahead and purchased some organic Red Clover seeds for sprouting. I chose them over alfalfa sprouts for the benefits they have, and also, to try something different from the more common alfalfa sprouts I'm accustomed to eating in club sandwiches and the like.


Here is my wide mouth, quart-sized mason jar with the sprout straining lid on it. To the right is 1 lb. of organic red clover seeds and you can also see my measuring spoon there.

Early morning on day 1 of sprout growing, I put two level tablespoons of seeds into the mason jar, swished some water around to rinse the seeds, and then drained the water. After rinsing, I added water to the jar again to fill 3/4 of it and let the seeds soak for about 12 hours.

After 12 hours before I went to bed, I dumped the water and left the jar upside down to let any excess water drain.

In the morning I filled the jar with water just enough to get the seeds moist, drained the water, and then layed the jar on its side with a towel over it. I did this once in the morning and once again before bed-time.


This photo was taken on day 3. I kept mine covered with a dish towel to prevent them from producing chlorophyll until I was ready for them to. (That is a personal preference.) The sprouts don't need light to grow.


With the towel taken off of the jar on day 3, you can see the result here where they are starting to get busy doing what sprouts do: sprout! tee hee!


This photo was taken on day 5. But on day 4, I took the towel off to let them get light and start producing some chlorophyll and this photo is the result of that. For me, I wanted to have the benefit of the nutrients that are produced in sprouts that have chlorophyll and also some that do not have chlorophyll in them. This is why I kept them covered and waited until they were almost ready to be stored. In the photo above that's the "green" side.


This is the "yellow" side where the sprouts have not fully matured in sunlight. There is a better photo of this once they come out of the jar.

After removing the sprouts from the jar, oh boy did it smell so great! I love the earthy grassy smell of things like these sprouts and tomatoes and things like that. Adorable! lol. Plant sprouts have a scent that makes my brain go squeeeee!


I carefully separated the mat of sprouts and put them in my salad spinner. You can see the patches of green in there with what look like patches of not-green. Now it is time for de-hulling:


While the sprouts are in the bowl they are submerged in water. The hulls of the seeds float to the top and can be dumped out. In the photo above you can see along the edges of my bowl they have floated up.


This is what it looked like from the side. The salad spinner was super nice to use and was recommended in a video I watched (different from the one I linked below) because I could pull out the colander and dump the casings with ease.


After de-hulling, my sprouts went for a really good spin in the salad spinner. Removing excess water is vital for them to remain edible for longer. Excessive moisture will cause them to rot more rapidly.

The amount I ended up storing in my Tupperware was more than expected. I don't have a weigh scale, but it is a lot of sprouts. I don't know what I'm going to do with all these sprouts in the next week. LOL.


For lunch I made sandwiches and it only took a tiny bit of sprouts to flavor the sandwich using them as an alternative to lettuce.

I ended up adding another couple of pinches of sprouts to a spring mix garden salad at dinnertime. Tomorrow for lunch, more sandwiches with a pinch of sprouts!

I will be trying mung bean sprouts when I get some seeds for them. Those are the ones that are often mixed into Asian stir fry. I am quite sure I'll use those fairly often.


Here is a video that shows how super easy it is to do this if you aren't already familiar:


The YouTube Video:


Nutritional Info for Red Clover Sprouts: (trifolium pratense)
Vitamins A, B, C, E and K
Calcium, Iron, Magnesium, Phosphorus, Potassium, Zinc
Carotene, Chlorophyll, Amino Acids, Trace Elements
Protein: 35%


Blood cleanser, alterative, diuretic, nervine, tonic, expectorant, demulcent, mildly laxative, mildly antispasmodic; positively affects blood circulation. Containts phyto-estrogens.

Disclaimer:
There are stories out there of how sprouts can be bad for you. The reality is; it is similarly as difficult to 'overdose' on the canavanine in sprouts as it is to die from an overdose of caffeine by drinking coffee. Canavanine is antibacterial, antiviral, antifungal, antiviral and antineoplastic. (Atineoplastics are used in chemotherapy to kill cancer cells.) The amino acid found in red clover is in much smaller quantities than alfalfa sprouts. Sprouts do not cause cancer, and do not cure it, but can assist with fighting it, and for use as a preventive for those with higher risk.

Like anything taken in large and excessively large amounts, sprouts contain something in them that can cause inflammation There are circumstances which contraindicate the ingestion of any kind of sprouts for people medically diagnosed with auto-immune and inflammatory diseases, anyone using blood thinners such as warfarin and for women who are pregnant.


Happy sprouting!


December 15, 2010

Natural Alternatives For Statins and Anticoagulants

Inevitably once we reach a specific age, certain drugs will be prescribed whether or not we “really” need them. They are prescribed for good measure and with good intention, like most drugs are.

When you hit the magical birthday that grants you (and your MediCare insurance) access to a whole candy-shop of new drugs to pay for, expect to see statins and blood thinners on the shopping list from your doctor.

Statins and anticoagulants are two types of drugs that are very commonly prescribed to men and women who fall into the age range of increased risk for heart attack or stroke. These drugs help prevent such an event from ever occurring.

What is a statin?


Statin drugs are known to lower cholesterol by inhibiting the liver’s ability to produce an enzyme called HMG Co-A reductase. The result of taking this drug regularly is a significant reduction in LDL (bad) cholesterol and a small increase in HDL (good) cholesterol.
They are sold as:
  • Lipitor (atorvastatin)
  • Lescol (fluvastatin)
  • Mevacor (lovastatin)
  • Pravachol (pravastatin)
  • Zocor (simvastatin)
  • Crestor (rosuvastatin)
Common side effects of the statins are gastrointestinal discomforts including nausea, gas and upset stomach. Less common are headache, dizziness, rash, and sleep disturbances.


What is an anticoagulant?


Anticoagulants are also called blood thinners. These drugs work to inhibit the ability of blood to clot and are most often prescribed to help prevent stroke from occurring. In the US and UK, the prescription drug of choice for this task is called a Coumadin which inhibits the body’s ability to properly modify vitamin K to do its job to help blood clot during a hemorrhage (bleeding). Popular prescriptions or recommendations are:
  • Miradon (anisindione)
  • Aspirin (acetylsalicylic acid)
  • Plavix (clopidogrel bisulfate)
  • Sintrom (acenocoumarol)
  • Warfarin (also coumadin, jantoven, marfarin)
  • Lovenox (enoxaparin)
  • Xarelto (rivaroxaban)
Abdominal pain, indigestion, diarrhea are possible side effects. Things to keep an eye on when using this medication are black, tarry-looking stools which can be a sign of intestinal bleeding as well as pink or blackened/smoky colored urine, indicating blood in the urine. Signs of internal bleeding should be treated as an emergency.


What are some alternatives?


  • Guggul (commiphora mukul)
  • Garlic (allium sativum)
  • Chromium (chromium picolinate)
  • Chickpea/Garbanzo bean (cicer arietinum)


What do the alternatives do?


• Guggul (also Guggulipid and Gugu-Lipid) is another name for the Mukul myrrh tree and its gummy resin is known to lower bad cholesterol and complimentarily raise good cholesterol. Early studies were published prematurely with negative reports, however, after further study and many more clinical trials, Guggulipid is showing even more promise than statins to produce highly favorable results.
A significant lowering of serum cholesterol (av. 23.6%) and serum triglycerides (av. 22.6%) was observed in 70-80% patients Double-blind, crossover study was completed in 125 patients with gugulipid therapy and in 108 patients with clofibrate therapy. Two patients had flu-like syndrome with clofibrate and opted out from the study. With gugulipid the average fall in serum cholesterol and triglycerides was 11 and 16.8% respectively and with clofibrate 10 and 21.6% respectively. The lipid lowering effect of both drugs became evident 3-4 week after starting the drug and had no relationship with age, sex, and concomitant drug intake.
Source: http://www.ncbi.nlm.nih.gov/pubmed/2693440
As a supplement, an excellent choice to take is when combined with Red Yeast Rice which has constituents in it that work as an anticoagulant. Only purchase Guggul where the label shows Guggul extract is standardized to 2.5% guggulsterones or better.

• Garlic has won its case as a blood thinner and is cautioned against in-taking while on other anticoagulant drugs such as Coumadin. In regards to lowering cholesterol, I have this information from studies done between 2009 and 2010:
Garlic is not so much effective in reducing the bad LDL cholesterol. Instead, it suppresses the oxidation of LDL cholesterol in blood, which in turn prevents formation of plaques in the arteries, to block them. Actually, it is not LDL Cholesterol that causes the damage rather it is the oxidized LDL Cholesterol, which is harmful. Thus, though not directly but garlic is a good substitute that is useful in treating cardiovascular diseases.
Source: http://www.ncbi.nlm.nih.gov/pubmed/10975959

• Chromium in the past was most often promoted as a supplement to help with carbohydrate metabolism, as a weight loss aid, and most recently, for assisting with regulating blood sugar. Another benefit of chromium is in fact, that it does help to lower bad cholesterol while raising good cholesterol.
Levels of total cholesterol, low-density lipoprotein (LDL) cholesterol, and apolipoprotein B, the principal protein of the LDL fraction, decreased significantly while the subjects were ingesting chromium picolinate. The concentration of apolipoprotein A-I, the principal protein of the high-density lipoprotein (HDL) fraction, increased substantially during treatment with chromium picolinate. The HDL-cholesterol level was elevated slightly but not significantly during ingestion of chromium picolinate. Only apolipoprotein B, of the variables measured, was altered significantly during supplementation with the placebo. These observations show that chromium picolinate is efficacious in lowering blood lipids in humans.
Source: http://www.ncbi.nlm.nih.gov/pmc/articles/PMC1002252/

• Chickpeas/Garbanzo beans - The wonderful benefits of this legume for lowering cholesterol are astounding.
The garbanzo-supplemented diet, which provided slightly less protein and fat, and more carbohydrate than the wheat-supplemented diet, resulted in a significant 3.9% drop in total cholesterol, which was largely due to a 4.6% drop in LDL "bad" cholesterol. It has been estimated that consumption of 100% of the daily value (DV) of folate would, by itself, reduce the number of heart attacks suffered by Americans each year by 10%. …Just one cup of cooked garbanzo beans provides 70.5% of the DV for folate.
As a food, hummus is a beautiful combination of ingredients made of pureed chickpeas, garlic, spices, lemon juice and olive oil (which also aids to lower bad cholesterol and increase good cholesterol). I tout this as the great circulatory system superfood to add to a diet. There is actually so much to the garbanzo beans on their own as a supplemental food, it would be a shame for you to miss out on reading the data.  Check the source below:
Source: http://www.whfoods.com/genpage.php?tname=foodspice&dbid=58


What’s Next?


Other natural remedies and supplements exist that help to keep cholesterol in good shape. The number of them readily available is too overwhelming to list but are not difficult to find using the internet.

To keep your cholesterol in good balance, choose foods high in fiber especially in complex carbohydrates, limit your sodium intake, cook with unsaturated fats and avoid trans fats and high fructose corn syrup. Foods once thought to be bad for cholesterol from back in the day when “all cholesterol was bad” have now been re-designated as healthy choices because they have found the cholesterol in them was beneficial. Eggs and avocado are just a couple of them. Don’t forget your walking shoes and get about 20 minutes of brisk walking and some fresh air (hopefully with sunshine).

If you are already on a prescribed medication to decrease your risk of heart attack or stroke do not replace your prescription with an alternative without first consulting your physician, do not take supplements of any of the above in addition to a statin or anti-clotting medication you are already taking. Do not self-dose these supplements for a suspected condition without the advice of an experienced herbalist or a naturopath. Here’s to your health!